本实例搭建环境如下:OPENLDAP Server 与 邮件环境分离系统:OPENLDAP RHEL 5.2邮件系统:postfix+dovecot+sasl2+openwebmail RHEL4.5(一) 搭建OPENLDAP Server 5.2 系统环境
本实例搭建环境如下:
OPENLDAP Server 与 邮件环境分离
系统:OPENLDAP RHEL 5.2
邮件系统:postfix+dovecot+sasl2+openwebmail RHEL4.5
(一) 搭建OPENLDAP Server 5.2 系统环境 (IP为192.168.88.236)
使用RPM包安装
[root@mail ~]# rpm -qa |grep openldap
openldap-servers-sql-2.3.27-8.el5_1.3
openldap-devel-2.3.27-8.el5_1.3
openldap-2.3.27-8.el5_1.3
openldap-clients-2.3.27-8.el5_1.3
openldap-servers-2.3.27-8.el5_1.3
将这些包全部安装上,包依赖关系请按照相关提示进行安装;
Openldap 使用的是Berkeley DB数据库,请安装
db4-4.3.29-9.fc6
将以上包安装好后,进行相关配置
1) 设置LDAP 使用的Schema
Openldap 安装后配置文件在/etc/openldap/目录下,为slapd.conf
Openldap /etc/openldap/schema目录下有许多常用的Schema 定义文件,使用他们可以进行日常应用。
Vi /etc/openldap/slapd.conf
找到include /etc/openldap/schema/core.schema
在其下添加:
include /etc/openldap/schema/corba.schema
include /etc/openldap/schema/cosine.schema
include /etc/openldap/schema/dyngroup.schema
include /etc/openldap/schema/inetorgperson.schema
include /etc/openldap/schema/java.schema
include /etc/openldap/schema/misc.schema
include /etc/openldap/schema/nis.schema
include /etc/openldap/schema/openldap.schema
2) 设置目录树的后缀
找到语句:
suffix "dc=my-domain,dc=com"
修改为:
suffix "dc=example,dc=com"
3) 设置LDAP管理员的DN
找到语句:
#rootdn "cn=Manager,dc=my-domain,dc=com"
改为
rootdn "cn=Manager,dc=example,dc=com"
4) 设置LDAP管理员口令
找到语句:
# rootpw secret
将其改为:
rootpw secret
或者使用设置密码
/usr/sbin/slappasswd
New password:
Re-enter new password:
{SSHA}0WBJHp4iO5lMSiKirUgdqwmm5tnzvmaf
然后将{SSHA}0WBJHp4iO5lMSiKirUgdqwmm5tnzvmaf
复制到rootpw位置
5) 启动LDAP 服务器
/etc/init.d/ldap start
然后查看进程
6) 建立初始化数据
为了后面能使用LDAP 客户端软件管理目录树,还要为目录树建立初始化数据,方法是将初始化数据保存在LDIF文件中,然后使用ldapadd命令导入LDAP 数据库中。
建立example.ldif文件,内容如下:
dn:dc=example,dc=com
objectclass:dcobject
objectclass:organization
o:Example, Inc.
dc:example
dn:cn=Manager,dc=example,dc=com
objectclass:organizationalRole
cn:Manager
然后执行以下命令导入数据:
ldapadd -x -W -D "cn=Manager,dc=example,dc=com" -f example.ldif
会提示导入成功!
7) PHPLDAP Admin 安装
由于基于WEB界面的LDAP 客户端软件phpLDAPadmin 使用的是PHP编写而成,因此在使用前应安装Apache+PHP 环境。
可以在安装光盘里安装httpd 和php软件和PHP-ldap 软件,这里使用的是自己已有的编译的PHP环境,记得PHP 要支持gettext.so ldap.so这两个扩展,同时基本的图片显示也要支持,这里不做介绍
然后下载phpldapadmin-0.9.8.5.tar.gz,放入apache 的主目录下。
进行apache DocumentRoot主目录下phpldap 目录下的config目录下,
cp config.php.example config.php
然后修改config.php项
修改// $ldapservers->SetValue($i,'server','host','127.0.0.1');
为$ldapservers->SetValue($i,'server','host','localhost');
修改// $ldapservers->SetValue($i,'server','port','389');
$ldapservers->SetValue($i,'server','port','389');
修改// $ldapservers->SetValue($i,'server','base',array(''));
$ldapservers->SetValue($i,'server','base',array('dc=example,dc=com'));
修改// $ldapservers->SetValue($i,'server','auth_type','cookie');
$ldapservers->SetValue($i,'server','auth_type','cookie');
修改// $ldapservers->SetValue($i,'login','dn','');
为$ldapservers->SetValue($i,'login','dn','cn=Manager,dc=example,dc=com');
修改// $ldapservers->SetValue($i,'login','pass','');
为$ldapservers->SetValue($i,'login','pass','secret');
然后启动apache即可通过WEB访问openldap Server.
按以下步骤操作创建LDAP 用户
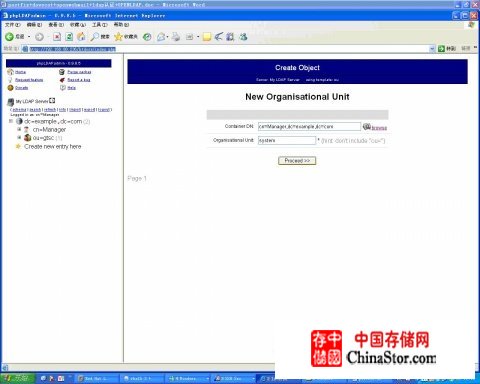
先建立OU:
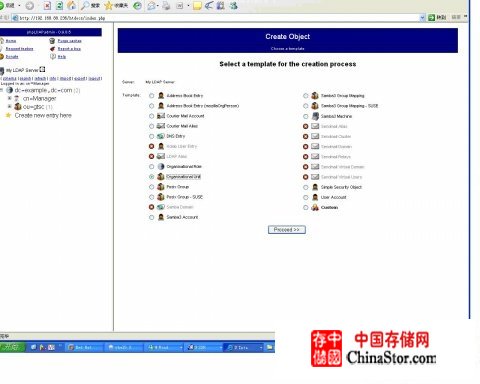
选择Organisational Unit,
然后按照提示操作成功创建。
接下来创建组:
和以上方法一样,选择posix group
创建用户:
和以上方法一样,选择user account;
记得关系为用户属于posix group ,属于OU 组织单位。
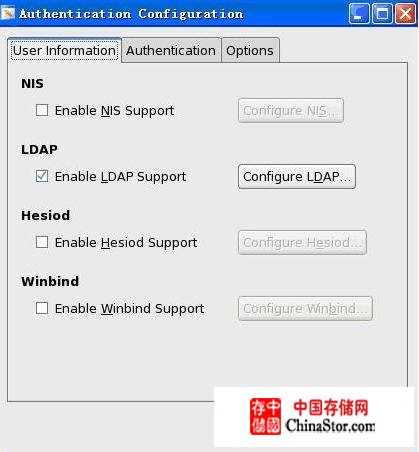
接下来我们使用系统帐户进行认证。
选择里User information & Authentication
选择Enable LDAP Support
然后,
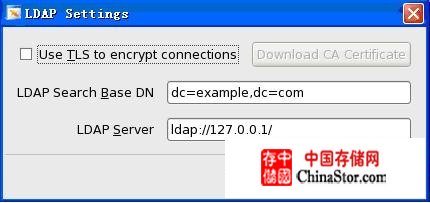
同样也可以直接修改系统上以下文件:
修改/etc/ldap.conf
base dc=example,dc=com
port 389
timelimit 120
bind_timelimit 120
idle_timelimit 3600
nss_initgroups_ignoreusers root,ldap,named,avahi,haldaemon,dbus,radvd,tomcat,radiusd,news,mailman
uri ldap://127.0.0.1/
ssl no
tls_cacertdir /etc/openldap/cacerts
pam_password md5
修改/etc/nsswitch.conf 文件中
netgroup: nisplus
为
netgroup: files ldap
automount: files nisplus
为
automount: files ldap
修改/etc/pam.d/system-auth
#%PAM-1.0
# This file is auto-generated.
# User changes will be destroyed the next time authconfig is run.
auth required pam_env.so
auth sufficient pam_unix.so nullok try_first_pass
auth requisite pam_succeed_if.so uid >= 500 quiet
auth sufficient pam_ldap.so use_first_pass
auth required pam_deny.so
account required pam_unix.so broken_shadow
account sufficient pam_succeed_if.so uid < 500 quiet
account [default=bad success=ok user_unknown=ignore] pam_ldap.so
account required pam_permit.so
password requisite pam_cracklib.so try_first_pass retry=3
password sufficient pam_unix.so md5 shadow nullok try_first_pass use_authtok
password sufficient pam_ldap.so use_authtok
password required pam_deny.so
session optional pam_keyinit.so revoke
session required pam_limits.so
session [success=1 default=ignore] pam_succeed_if.so service in crond quiet use_uid
session required pam_unix.so
session optional pam_ldap.so
此时使用已经建立的LDAP 用户即可登陆系统本地。
8) 可以使用基于KDE环境的GQ LDAP client 来进行安装,下载后编译进行安装。
这里下载的是gq-1.3.4.tar.gz;
安装时,大概需要以下依赖包
perl-XML-LibXML-1.58-5.i386.rpm
perl-XML-NamespaceSupport-1.09-1.2.1.noarch.rpm
perl-XML-SAX-0.14-5.noarch.rpm
perl-XML-LibXML-Common-0.13-8.2.2.i386.rpm
perl-XML-LibXML-1.58-5.i386.rpm
perl-XML-Dumper-0.81-2.fc6.noarch.rpm
perl-XML-Parser-2.34-6.1.2.2.1.i386.rpm
perl-XML-LibXML-1.58-5.i386.rpm
然后,configure Cprefix=/usr/local/gq
make;make install
(二) 接下来搭建邮件服务器
邮件服务器使用rhel 4.5 系统环境 (IP为:192.168.88.237)
安装所需要的软件清单:
postfix-2.2.5-3.rhel4.rpm
postfix-pflogsumm-2.1.5-4.2.rhel4.rpm
cyrus-sasl-2.1.19-5.rhel4.i386.rpm
dovecot-0.99.11-2.rhel4.1.rpm
httpd-2.0.52-12.ent.rpm
perl-Text-Iconv-1.4-1.2.el4.rf.i386.rpm
perl-suidperl-5.8.5-12.1.1.i386.rpm
perl-Compress-Zlib-1.34-1.2.el4.rf.i386.rpm
perl-CGI-SpeedyCGI-2.22-1.2.el4.rf.i386.rpm
perl-5.8.5-12.1.i386.rpm
openwebmail-2.51-1.i386.rpm
Authen-PAM-0.14.tar.gz (openwebmail 加载pam使用)
cyrus-sasl
确认系统是否有安装cyrus-sasl-2.1.19-5.rhel4.i386.rpm
rpm Cqa |grep cyrus-sasl-2.1.19,如没有则进行安装
rpm Civh cyrus-sasl-2.1.19-5.rhel4.i386.rpm
配置cyrus-sasl 验证方式
ln -s /usr/lib/sasl2/smtp.conf /usr/local/lib/smtp.conf
vi /usr/local/lib/smtp.conf,内容如下
pwcheck_method: saslauthd
log_level:2
mech_list:PLAIN LOGIN
vi /etc/sysconfig/saslauthd
把MECH=shadow 改成 MECH=pam
同时vi /etc/init.d/saslauthd
把 MECH=shadow 改成 MECH=pam
启动saslauthd 进程,看到如下进程则显示正常
service saslauthd restart 或/etc/init.d/saslauthd start
[root@mail init.d]# ps -ef |grep saslauthd |grep -v grep
root 3820 1 0 12:47 ? 00:00:00 /usr/sbin/saslauthd -m /var/run/saslauthd -a pam
root 3827 3820 0 12:47 ? 00:00:00 /usr/sbin/saslauthd -m /var/run/saslauthd -a pam
root 3828 3820 0 12:47 ? 00:00:00 /usr/sbin/saslauthd -m /var/run/saslauthd -a pam
root 3831 3820 0 12:47 ? 00:00:00 /usr/sbin/saslauthd -m /var/run/saslauthd -a pam
root 3832 3820 0 12:47 ? 00:00:00 /usr/sbin/saslauthd -m /var/run/saslauthd -a pam
1.3 安装配置postfix
#killall sendmail (停止所有的Sendmaail进程)
sendmail: no process killed
# rpm -ivh postfix-2.2.5-3.rhel4.i386.rpm
Preparing... ########################################### [100%]
1:postfix ##################################### [100%]
安装后会默认在/etc下建立postfix目录和其下相关配置文件。
修改/etc/postfix/main.cf主配置文件
#myhostname = host.domain.tld
更改为:
myhostname = mail.peoplenet.bk(指定运行Postfix邮件系统的主机名称)
#mydomain = domain.tld
更改为:
mydomain = peoplenet.bk (指定Postfix邮件系统使用的域名比例:easy.com)
#inet_interfaces = all
更改为:
inet_interfaces =all (指定Postfix邮件系统监视的网络接口)
#mydestination = $myhostname, localhost.$mydomain, localhost, $mydomain, mail.$mydomain
更改为:
mydestination = $myhostname, localhost.$mydomain, localhost, $mydomain, mail.$mydomain(指定Postfix接收邮件时收件人的域名)
#mynetworks = host
更改为:
mynetworks = 192.168.86.0/24, 127.0.0.1/8 (指定您所在的网络地址)
接下来增加saslauthd 验证
smtpd_sasl_auth_enable = yes
broken_sasl_auth_clients = yes
smtpd_sasl_security_options = noanonymous
smtpd_sasl_local_domain = $myhostname
smtpd_recipient_restrictions =
permit_sasl_authenticated,
permit_mynetworks,
check_relay_domains,
reject_unauth_destination
smtpd_client_restrictions = permit_sasl_authenticated
smtp_helo_name = mail.peoplenet.bk
# service postfix restart (重新启动postfix服务)
Shutting down postfix: [ 确定 ]
Starting postfix: [ 确定 ]
测试端口
[root@mail ~]# telnet mail.peoplenet.bk 25
Trying 192.168.86.229...
Connected to mail.peoplenet.bk (192.168.86.229).
Escape character is '^]'.
220 mail.peoplenet.bk ESMTP Postfix
ehlo localhost
250-mail.peoplenet.bk
250-PIPELINING
250-SIZE 10240000
250-VRFY
250-ETRN
250-AUTH LOGIN PLAIN
250-AUTH=LOGIN PLAIN
250 8BITMIME
当出现250-AUTH LOGIN PLAIN时,则代表postfix 加载sasl验证成功。
dovecot 服务器
确认系统是否有安装dovecot POP服务器,没有的话则进行安装
rpm Cqa |grep dovecot
# rpm -ivh dovecot-0.99.11-2.rhel4.1.rpm
修改dovecot 配置文件,确认以下配置
protocols = imap imaps pop3 pop3s
imap_listen = *:143
pop3_listen = *:110
ssl_disable = yes
log_path = /var/log/dovecot.log
info_log_path = /var/log/dovecot.msg
log_timestamp = "%b %d %H:%M:%S "
login_dir = /var/run/dovecot-login
login = imap
login = pop3
mbox_locks = fcntl
auth = default
auth_mechanisms = plain
auth_userdb = passwd
auth_passdb = pam
auth_user = root
# service dovecot restart(重新启动dovecot服务)
停止 Dovecot Imap: [ 确定 ]
启动 Dovecot Imap: [ 确定 ]
测试POP3端口
# telnet mail.peoplenet.bk 110 (测试110端口)Trying 127.0.0.1...
Connected to localhost.localdomain (127.0.0.1).
Escape character is '^]'.
+OK dovecot ready.
quit
+OK Logging out
Connection closed by foreign host.
则代表dovecot 安装配置成功。
openwebmail 2.51
# service httpd restart (启动httpd服务)
停止 httpd: [ 确定 ]
启动 httpd: [ 确定 ]
# rpm -ivh perl-5.8.5-12.1.i386.rpm
# rpm -ivh perl-CGI-SpeedyCGI-2.22-1.2.el4.rf.i386.rpm
# rpm -ivh perl-Compress-Zlib-1.34-1.2.el4.rf.i386.rpm
# rpm -ivh perl-suidperl-5.8.5-12.1.1.i386.rpm
# rpm -ivh perl-Text-Iconv-1.4-1.2.el4.rf.i386.rpm
安装Authen-PAM-0.14.tar.gz
gtar zxvf Authen-PAM-0.14.tar.gz
#cd Authen-PAM-0.14
#perl Makefile.PL
#make
#make install
# rpm -ivh openwebmail-2.51-1.i386.rpm
warning: openwebmail-2.51-1.i386.rpm: V3 DSA signature: NOKEY, key ID cfb164d8
Preparing... ######################################### [100%]
1:penwebmail ###################################### [100%]
# cd /var/www/cgi-bin/openwebmail/
# touch dbm.conf
dbm_ext .db
dbmopen_ext .db
dbmopen_haslock no
修改 /var/www/cgi-bin/openwebmail/etc/openwebmail.conf 文件:
domainnames auto
更改为:
domainnames peoplenet.bk (更改为自己定义的域名)
auth_module auth_unix.pl
更改为:
#auth_module auth_unix.pl
auth_module auth_pam.pl(使用PAM认证模块)
default_language en
更改为:
default_language zh_CN.GB2312 (更改为简体中文版介面)
default_iconset Cool3D.Englist
更改为:
default_iconset Cool3D.Chinese.Simplified (更改为中文3D按键)
修改/var/www/cgi-bin/openwebmail/etc/defaults/openwebmail.conf文件:
smtpserver 127.0.0.1
更改为:
smtpserver 192.168.86.229 (更改smtp服务器的地址)
authpop3_server localhost
更改为:
authpop3_server 192.168.86.229 (更改pop3服务器的地址)
auth_module auth_unix.pl
更改为:
#auth_module auth_unix.pl
auth_module auth_pam.pl(使用PAM认证模块)
修改/var/www/cgi-bin/openwebmail/etc/defaults/dbm.conf文件:
dbmopen_ext none
更改为:
dbmopen_ext .db
dbmopen_haslock no
更改为:
dbmopen_haslock yes
smtpserver 192.168.86.229 (添加smtp服务器的地址)
修改/var/www/cgi-bin/openwebmail/etc/defaults/auth_pam.conf,确认内容如下:
#servicename login (系统默认)
servicename openwebmail (对于增加的PAM 认证要使用这个)
这个是确认/etc/pam.d下加载PAM服务的文件名
passwdfile_plaintext /etc/passwd
check_nologin no
check_shell no
check_cobaltuser no
运行openwebmail-tool.pl文件:
#cd /var/www/cgi-bin/openwebmail/
# ./openwebmail-tool.pl --init
creating db /var/www/cgi-bin/openwebmail/etc/maps/b2g ...done.
creating db /var/www/cgi-bin/openwebmail/etc/maps/g2b ...done.
creating db /var/www/cgi-bin/openwebmail/etc/maps/lunar ...done.
Welcome to the Open WebMail!
This program is going to send a short message back to the developer,
so we could have the idea that who is installing and how many sites are
using this software, the content to be sent is:
OS: Linux 2.6.9-11.EL i686
Perl: 5.008005
WebMail: Open WebMail 2.51 20050228
Send the site report?(Y/n) y (输入y,然后按回车键)
sending report...
Thank you.
2 开机启动
1. postfix+saslauthd 开机启动
chkconfig saslauthd on
chkconfig postfix on
chkconfig sendmail off (取消sendmail开机启动(系统默认启动))
2. dovecot 开机启动
chkconfig dovecot on
3. httpd 开机启动
chkconfig httpd on
测试:
通过修改/etc/ldap.conf
中
host 192.168.88.236
base dc=example,dc=com
scope sub
timelimit 120
bind_timelimit 120
idle_timelimit 3600
pam_login_attribute uid
ssl no
tls_cacertdir /etc/openldap/cacerts
pam_password md5
修改/etc/pam.d/目录下以下三个文件可实现基于PAM LDAP的认证:
[root@mail pam.d]# more smtp
#%PAM-1.0
#auth required /usr/local/lib/libpam_ikey.so FILENAME=normal
#auth required pam_stack.so service=system-auth
#auth required /lib/security/pam_unix.so use_first_pass
#account required pam_stack.so service=system-auth
auth sufficient pam_ldap.so
account sufficient pam_ldap.so
[root@mail pam.d]# more dovecot
#%PAM-1.0
#auth required pam_nologin.so use_mapped_pass
#auth required pam_stack.so service=system-auth
#account required pam_stack.so service=system-auth
#session required pam_stack.so service=system-auth
auth sufficient pam_ldap.so
account sufficient pam_ldap.so
[root@mail pam.d]# more openwebmail
#%PAM-1.0
#auth required pam_stack.so service=system-auth
#account required pam_stack.so service=system-auth
#auth required /lib/security/pam_unix.so
#account required /lib/security/pam_unix.so
#password required /lib/security/pam_unix.so
auth sufficient pam_ldap.so
account sufficient pam_ldap.so
然后通过outlook,使用LDAP Server 上建立的用户访问邮件服务器。
如ldap server 上建立了用户test,
进行访问测试。
如果要使用LDAP 用户登陆本地,也可以使用相同方法authconfig-gtk 设置LDAP Server信息,既可登陆访问237 系统。
声明: 此文观点不代表本站立场;转载须要保留原文链接;版权疑问请联系我们。