这里分享一下Nginx转发HTTP请求到Apache服务器,希望对于初学Nginx服务器相关的朋友有帮助,更多Nginx安装、配置、报错处理等资源请本站内搜索。。
NGiNX 做前端反向代理处理静态请求,并发能力强,稳定,且占用内存少。 Apache 做后端 WEB 服务处理动态请求,高效,稳定,所以二者的搭配恰到好处。
CentOS 6.4 x86_64
nginx 1.4.1
Apache 2.2.15
配置 NGiNX 转发# vi /etc/nginx/nginx.conf
添加以下内容;
# NGiNX 负载均衡upstream backend {
server 127.0.0.1:81 weight=1 fail_timeout=30s;
server 127.0.0.1:82 weight=1 fail_timeout=30s;
server 127.0.0.1:83 weight=1 fail_timeout=30s;
}
server {
监听 80
listen 80;
server_name test.aboutc.net;
access_log /var/log/nginx/aboutc-test.access.log main;
静态文件访问目录
root /var/www/html/test;
index index.html index.php;
监听 ".php" 文件
location ~ .php$ {
# 转发
proxy_pass http://backend;
proxy_redirect off;
proxy_set_header Host $host;
# 获取真实 IP
proxy_set_header X-Real-IP $remote_addr;
proxy_set_header X-Forwarded-For $proxy_add_x_forwarded_for;
proxy_set_header X-Client-Verify SUCCESS;
proxy_set_header X-SSL-Subject $ssl_client_s_dn;
proxy_set_header X-SSL-Issuer $ssl_client_i_dn;
proxy_read_timeout 65;
}
}
首先 NGiNX 要监听 80 端口成为前端代理的身份, 其次要配置 upstream 通过 proxy_pass 转发到后端 Apache 的监听地址, 完成动态请求的处理。这里的 NGiNX 只需要转发 .php 文件即可,它自身可以 直接获取 js/css 等静态文件。
配置 Apache VirtualHost# vi /etc/httpd/conf.d/vhost.conf
注释掉 NameVirtualHost:
#NameVirtualHost *:80
并添加以下内容
Listen 81Listen 82
Listen 83
<VirtualHost *:81>
DocumentRoot /var/www/html/test
ServerName test.aboutc.net
ErrorLog logs/test81-error_log
CustomLog logs/test81-access_log common
</VirtualHost>
<VirtualHost *:82>
DocumentRoot /var/www/html/test
ServerName test.aboutc.net
ErrorLog logs/test82-error_log
CustomLog logs/test82-access_log common
</VirtualHost>
<VirtualHost *:83>
DocumentRoot /var/www/html/test
ServerName test.aboutc.net
ErrorLog logs/test83-error_log
CustomLog logs/test83-access_log common
</VirtualHost>
/etc/httpd/conf.d/vhost.conf 文件是 Apache 配置文件 /etc/httpd/conf/httpd.conf 通过 Include conf.d/*.conf 引入的。请根据实际环境配置相应文件。
重启 NGiNX 和 Apache 服务使之生效重新加载 NGiNX 配置:
# service nginx reload
重启 Apache 服务:
# service httpd start(13)Permission denied: make_sock: could not bind to address [::]:81
(13)Permission denied: make_sock: could not bind to address 0.0.0.0:81
no listening sockets available, shutting down
Unable to open logs
[FAILED]
此问题是由于开启 SELINUX 引起的,关闭 SELINUX:
# setenforce 0
此方法是临时关闭 SELINUX,如果想永久关闭 SELINUX,编辑 /etc/selinux/config, 将 SELINUX=enforcing 改为 SELINUX=disabled,重启系统。
再次重启 Apache:
# service httpd restartStopping httpd: [ OK ]
Starting httpd: [ OK ]
测试是否转发成功
添加 test.aboutc.net 到 /etc/hosts,以便我们可以直接在本地访问测试:
# vi /etc/hosts
添加以下内容:
127.0.0.1 test.aboutc.net
编辑测试文件
$ vi /var/www/html/test/index.php
添加以下内容:
<?phpphpinfo();
?>
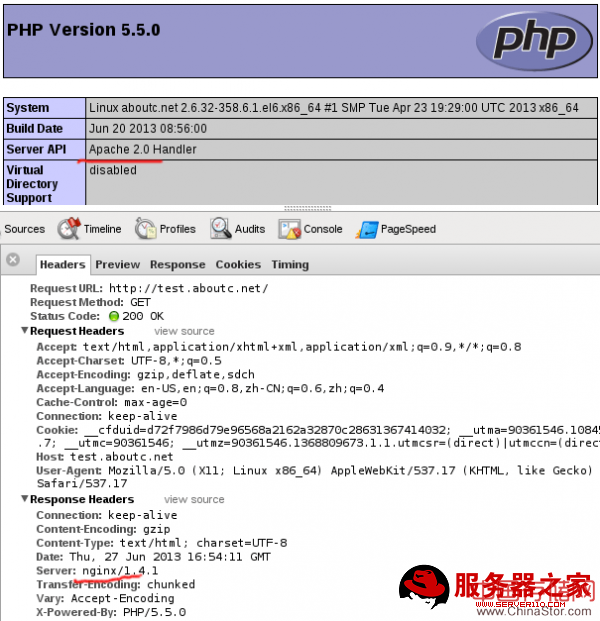
打开浏览器,访问测试地址 http://test.aboutc.net/,如下图:
声明: 此文观点不代表本站立场;转载须要保留原文链接;版权疑问请联系我们。