本篇分享了CentOS6.3使用https连接实现双向认证详细配置过程,希望对于初学Apache服务器相关的朋友有帮助,更多Apache安装、配置、报错处理等资源请本站内搜索。
1. 使用最小化安装盘安装系统,设置好网络环境配置信息
2. 安装所需工具包
# yum install openssh-server
# yum install wget
# yum update
# yum install setuptool
系统服务配置 # yum install ntsysv
安装网络配置 # yum install system-config-network-tui
防火墙配置 # yum install system-config-firewall
# yum -y install gcc gcc-c++ autoconf make
# yum -y install vim
关机备份 # shutdown -h now
二、安装openssl
切换到/tmp目录下(安装约定软件全放在此目录下)
cd /tmp
# tar zxvf openssl-1.0.0a.tar.gz
# cd openssl-1.0.0a
# ./config --prefix=/usr/local/openssl
# make && make install
三、创建证书
1.解压工具包
# tar zxvf ssl.ca-0.1.tar.gz
# cd ssl.ca-0.1
2.创建根证书
# ./new-root-ca.sh
No Root CA key round. Generating one
Generating RSA private key, 1024 bit long modulus
....++++++
...................++++++
e is 65537 (0x10001)
Enter pass phrase for ca.key:
Verifying - Enter pass phrase for ca.key:
Self-sign the root CA...
Enter pass phrase for ca.key:
You are about to be asked to enter information that will be incorporated
into your certificate request.
What you are about to enter is what is called a Distinguished Name or a DN.
There are quite a few fields but you can leave some blank
For some fields there will be a default value,
If you enter '.', the field will be left blank.
-----
Country Name (2 letter code) [MY]:cn
State or Province Name (full name) [Perak]:cn
Locality Name (eg, city) [Sitiawan]:cn
Organization Name (eg, company) [My Directory Sdn Bhd]:cn
Organizational Unit Name (eg, section) [Certification Services Division]:cn
Common Name (eg, MD Root CA) []:172.16.17.132 //这里填站点域名,我是测试的就填ip
Email Address []:[email protected]
这个过程要设置证书密码,要记住这个密码后面要用到,还有证书的其它信息:国家、地区、公司名称,域名,邮箱等,这些信息也要记住,与后面创建的证书主体信息一致
3.创建服务器证书
# ./new-server-cert.sh server
...
即创建一个名为server的服务器证书,主体信息与上面的一致就可,我这里就不贴出来了
签名刚才生成的服务器证书
# ./sign-server-cert.sh server
这个过程要输入根证书密码,后面都选Y即可
4.创建客户端证书,如果是单向认证,这一步可以跳过
# ./new-user-cert.sh client
...
这里要注意证书信息不能与其它证书完全一样,这里修改Email与服务器证书不一样就行
签名客户端证书
# ./sign-user-cert.sh client
转换成p12格式证书,这样才能在浏览器上安装
# ./p12.sh client
下载并安装client.p12证书
关机备份 # shutdown -h now
三、安装Apache及其所需依赖软件
# tar zxvf httpd-2.2.23.tar.gz
# cd httpd-2.2.23
# ./configure --prefix=/usr/local/apache
--enable-ssl
--enable-rewrite
--enable-so
--with-ssl=/usr/local/openssl
# make && make install
可以启动httpd看看,启动命令是/usr/local/apache/bin/apachectl start,在浏览器中访问看看,显示 It workds!说明安装成功了
四、配置httpd
1.修改httpd.conf
#Include conf/extra/httpd-ssl.conf 把这句前面的#去掉
2.将前面生成的证书拷贝到conf/ssl 下
# mkdir ssl
# cd ssl
# cp /tmp/ssl.ca-0.1/ca.crt ./
# cp /tmp/ssl.ca-0.1/server.* ./
2.修改httpd-ssl.conf
SSLCertificateFile “/usr/local/apache/conf/ssl/server.crt”
SSLCertificateKeyFile “/usr/local/apache/conf/ssl/server.key”
下面是开启客户端认证,如果是单向认证就不用开启了
SSLCACertificateFile “/usr/local/apache/conf/ssl/ca.crt”
SSLVerifyClient require
SSLVerifyDepth 10
五、重启httpd
[[email protected] extra]# ../../bin/apachectl -t
Syntax OK
[[email protected] extra]# ../../bin/apachectl stop
[[email protected] extra]# ../../bin/apachectl -D SSL -k start
六、安装并配置MySQL
1、安装Mysql
添加一个mysql标准组
# groupadd mysql
添加mysql用户并加到mysql组中
# useradd -g mysql mysql
# tar zxvf mysql-5.0.45.tar.gz
# cd mysql-5.0.45
# ./configure
--prefix=/usr/local/mysql/
--with-extra-charsets=all
出现错误:
checking for tgetent in -lncurses... no
checking for tgetent in -lcurses... no
checking for tgetent in -ltermcap... no
checking for tgetent in -ltinfo... no
checking for termcap functions library... configure: error: No curses/termcap library found
分析:缺少ncurses安装包
解决:
# yum install ncurses-devel
# make && make install
2、配置Mysql
创建MySQL数据库服务器的配置文件
# cp support-files/my-medium.cnf /etc/my.cnf
用mysql用户创建授权表,创建成功后,会在/usr/local/mysql目录下生成一个var目录
# /usr/local/mysql/bin/mysql_install_db --user=mysql
将文件的所有属性改为root用户
# chown -R root /usr/local/mysql
将数据目录的所有属性改为mysql用户
# chown -R mysql /usr/local/mysql/var
将组属性改为mysql组
# chgrp -R mysql /usr/local/mysql
启动数据库
# /usr/local/mysql/bin/mysqld_safe --user=mysql &
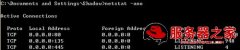
查看3306端口是否开启
# netstat -tnl|grep 3306
简单的测试
# /usr/local/mysql/bin/mysqladmin version
查看所有mysql参数
# /usr/local/mysql/bin/mysqladmin variables
设置Mysql开机自启动
# cp /tmp/mysql-5.0.45/support-files/mysql.server /etc/rc.d/init.d/mysqld
# chown root.root /etc/rc.d/init.d/mysqld
# chmod 755 /etc/rc.d/init.d/mysqld
# chkconfig --add mysqld
# chkconfig --list mysqld
# chkconfig --levels 245 mysqld off
3、Mysql安全性设置
没有密码可以直接登录本机服务器
# /usr/local/mysql/bin/mysql -u root
查看mysql用户权限信息
mysql> select * from mysql.user;
删除非localhost的主机
mysql> DELETE FROM mysql.user WHERE Host='localhost' AND User='';
刷新授权表
mysql> FLUSH PRIVILEGES;
为root用户添加密码
mysql> SET PASSWORD FOR 'root'@'localhost' = PASSWORD('yuwan1986');
再次进入Mysql客户端
# /usr/local/mysql/bin/mysql -u root -h localhost -p
关闭MySQL数据库
# /usr/local/mysql/bin/mysqladmin -u root -p shutdown
七、 安装和配置php
# tar zxvf php-5.2.6.tar.gz
# cd /tmp/php-5.2.6
# ./configure
--prefix=/usr/local/php
--with-config-file-path=/usr/local/php/etc
--with-apxs2=/usr/local/apache/bin/apxs
--with-mysql=/usr/local/mysql/
# make && make install
出现依赖错误,直接使用yum安装即可
# yum -y install libxml2 libxml2-devel
简单配置PHP
cp ./php.ini-dist /usr/local/php/etc/php.ini
使用vi编辑apache配置文件
# vim /usr/local/apache/conf/httpd.conf
添加这一条代码
Addtype application/x-httpd-php .php .phtml
重启Apache
# /usr/local/apache/bin/apachectl restart
简单测试一下对PHP的支持
八、安装安装phpMyAdmin
1. 拷贝目录到指定位置并改名为phpmyadmin
# tar zxvf phpMyAdmin-3.3.4-all-languages.tar.gz
# cp -a phpMyAdmin-3.3.4-all-languages /usr/local/apache/htdocs/phpmyadmin
# cd /usr/local/apache/htdocs/phpmyadmin/
# cp config.sample.inc.php config.inc.php
2. 配置phpMyAdmin
# vim /usr/local/apache/htdocs/phpmyadmin/config.inc.php
将auth_type 改为http
$cfg['Servers'][$i]['auth_type'] = 'http';
最后设置开机启动项:
编辑开机启动文件# vim /etc/rc.d/rc.local添加
service mysqld start
/usr/local/apache/bin/apachectl -D SSL -k start
至此简单配置完成,可以安装到服务器上了。后面会附上详细设置。
声明: 此文观点不代表本站立场;转载须要保留原文链接;版权疑问请联系我们。