微软Azure迁移工具MA的介绍,以及详细安装配置方法,包括MA帐号的注册,帮助你快速将应用迁移到微软的Azure平台上。
MA介绍
MA是为无缝迁移物理机、Vmware虚拟机、Amazon网页服务以及微软Hyper-V应用到Azure而设计的工具软件,迁移时,能够自动发现源工作流,自动发现远程客户端,网络适配器及配置。
MA changes the cloud migration paradigm by offering:
- Heterogeneity: With MA you can migrate workloads running on a broad range of platforms such as VMware, Microsoft Hyper-V, Amazon Web Services and/or Physical servers within your environment. MA can support workloads running on Windows Server 2008 R2 sp1, Windows Server 2012 and Windows Server 2012 R2 operating systems.
- Simple, Automated Migration: The MA portal allows you to automatically discover your enterprise workloads, remotely from the cloud. With few clicks you can configure end-to-end migration scenarios. MA allows you to test your workload in the cloud without impacting the existing on premises production workload offering the ability to validate workload functionality before a cutover is performed.
- Migrate Multi-tier Applications: MA boasts the unique ability to migrate multi-tier production system with application level consistency orchestrated across tiers. This ensures multi-tier applications run the same in Azure, as they ran at the source. Application startup order is even honored, without the need for any manual configuration.
- Continuous Replication, Least Cutover Time: MA for Azure provides full-system replication including the OS and application data. This continuous replication and in-memory change tracking reduces the cutover time to mere minutes, minimizing impact to product workloads.
MA安装步骤
1、理解产品
Before you start using MA, you must understand different components of the product and its functionality. In addition, learn about the Azure capabilities and limitations.
- Read Introduction to MA to get an overview about the product.
- Read Prerequisite and Support Matrix will help you understand the capabilities and limitations.
For more information, see Virtual Machine and Cloud Service Sizes for Azure and Azure Subscription and Service Limits, Quotas, and Constraints.
2、了解迁移前的环境
- Azure Account subscription is required to migrate your source Enterprise servers to Azure. If you do not have Azure Account, get a free trial account.
- Sign Up for MA preview.
- After approval, you will receive an email (as shown below) with - login URL, User ID and Password for MA portal.

2.1 估算
You need to plan for how to deploy the following components:
- CS specification – A3 size VM in Azure to install Configuration Server (CS)
- MT specification – A4 size VM in Azure to install Master Target (MT). You also need a dedicated data disk (of 1023 GB) for managing Retention Points.
- Cores per subscription – Calculate the CPU core requirements for your migration project and compare it with the quota set by Azure. For more information on how to request quota increase read Understanding Azure Limits and Increases. For example, if you want to migrate 3 source VMs having 8GB RAM with dual core, then best match on Azure VM for all three VMs is A3 size (each with 4 cores). You will end up using 12 cores (3VMs x 4 cores), plus 4 (for A3 size CS) plus 8 (for A4 size MT) - i.e. you will need 24 cores to support above scenario.
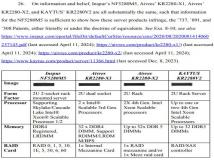
- Process Server specification – You need a dedicated virtual or physical instance for the Process Server (PS in Source Enterprise) to facilitate communication between the Mobility Service (agents) on source machines and the Master Target in Azure. The specifications for this server depends on data change rate of source servers, use the below table as a reference:
Data Change Rate CPU Memory Boot Volume Capacity Cache Directory Disk Size Including Cache Directory Based on Outage Minimum Total Disk Throughput Required NIC Details Less than or equal to 300 GB per day 1 Quad core (2.2GHz, 4.0MB Cache or Higher) 8 GB Physical RAM min 40 GB Minimum of 400 GB (6 Hours Outage) 15 - 20 MBps 2 x 1 GigE NIC cards recommended with Static IP addressing scheme Less than or equal to 700GB per day
2 Quad core (2.66GHz, 4.0MB Cache or Higher) 16 GB Physical RAM min 40 GB Minimum of 790 GB (6 Hours Outage) 34.9 - 46.6 MBps 2 x 1 GigE NIC cards recommended with Static IP addressing scheme Less than or equal to 1 TB 2 Quad core (2.66GHz, 4.0MB Cache or Higher) 32 GB Physical RAM min 40 GB Minimum of 790 GB (6 Hours Outage) 51.2 - 68.27 MBps 2 x 1 GigE NIC cards recommended with Static IP addressing scheme
*for data change rate greater than 1TB, you have to scale out PS servers.
2.2 网络准备
During migration, you have to set up network mapping between source Enterprise server and Azure. You can do this in two ways:
- Using NAT IP. To do this, A) Register NAT IP address of the PS to CS server in Azure. The Master Target, where initial VHDs are created for migrated VMs is registered to this CS server, B) Create vNet and subnet and use them during migration. You can plan to use the same vNet if you want to migrate particular site to same network.
- Using Site to Site VPN. If you are using site-to-site VPN connectivity for secured data communication then NAT IP address is not required for PS server. For more information, see Connect an On-premises Network to Azure via Site to Site VPN and Extend Active Directory onto an IaaS VM DC in Azure, Microsoft Virtual Academy Course on Azure Site to Site VPN.
3、安装CS,即Configuration Server (CS) in Azure
Follow the step-by-step instructions listed in HELP under 'Install and Configuration' > 'Create and Install Components in Azure' section.
In section ‘Register CS IP to MA’ you will be prompted for RX IP address and HTTPs port number. You can ping the MA portal URL (that was emailed to you) from cmd(command window) to the get the IP address for ex:
ping <url that sent to you>.cloudapp.net
Use 443 for the default HTTPS port address.
Note: Ensure the VM you choose to provision CS is at least of A3 size.
4、安装MT,Install Master Target (MT) in Azure
Follow the step-by-step instructions listed in HELP under 'Install and Configuration' > 'Install Master Target on Windows' section
Note: ensure the VM you chose to provision for MT is at least of A4 size. This will ensure, MT can migrate source servers with data disks up to 15 (one is reserved by MT for storing Retention Points).
5、安装PS, Install Process Server (PS) in your Enterprise
Follow the step-by-step instructions listed in HELP under 'Install and Configuration' > 'Install Components in Source Enterprise' > ‘Install Process Server in Source Enterprise’ section.
If you are not using Site-to-Site VPN, then Configure your PS for NAT IP. Follow the step-by-step instructions listed in HELP in under 'Install and Configuration' > 'Install Components in Source Enterprise' > ‘Configure NAT IP Address’ section.
Ensure the out bound ports on the PS are configured for the MT to pull replication data. Refer to HELP under ‘Outbound Port Configuration’ to know which port to open.
To discover VMware based source Enterprise servers, follow the install instructions for vCLI on Process Server.
6、注册MA, Register your MA Account to Azure Account
Follow the step-by-step instructions listed in HELP in under 'Install and Configuration' > ‘Register your MA Account to Azure Account’ section.
关于MA的介绍和安装是整理了微软官方资料及technet博客文章,参考资料:
http://azure.microsoft.com/blog/2014/09/04/introducing-microsoft-migration-accelerator/
http://blogs.technet.com/b/srinathv/archive/2014/09/18/step-by-step-guide-on-installing-microsoft-migration-accelerator.aspx
声明: 此文观点不代表本站立场;转载须要保留原文链接;版权疑问请联系我们。