本文介绍Linux系统中Apache服务器的安装与配置,希望对于初学Apache服务器相关的朋友有帮助,更多Apache安装、配置、报错处理等资源请本站内搜索。
APACHE的简介.
APACHE是世界上最流行的Web服务器软件之一,当然,提供WWW服务的还有微软的IIS,它是由微软开发的,只能用在微软的操作系统上,而APACHE是一个自由软件。说到APACHE,还要联想到LAMP,这个近年来也是应用得非常广泛,LAMP就是:linux+apache+mysql+php。Apache的特点是简单、速度快、性能稳定。
APACHE的安装。
配置IP地址:
[[email protected] ~]# vi /etc/sysconfig/network-scripts/ifcfg-eth0
IPADDR=192.168.100.101
NETMASK=255.255.255.0
[[email protected] ~]# service network restart
安装apache:
首先安装下面这两个软件:
[[email protected] ~]# rpm -ivh /misc/cd/Server/apr-1.2.7-11.el5_3.1.i386.rpm
[[email protected] ~]# rpm -ivh /misc/cd/Server/apr-util-1.2.7-11.el5.i386.rpm
现在才能安装httpd。
[[email protected] ~]# rpm -ivh /misc/cd/Server/httpd-2.2.3-43.el5.i386.rpm
APACHE简单的配置。
[[email protected] ~]# service httpd start //启动服务。
现在就可以测试一下了。如图,如下在地址栏输入http://192.168.100.101,出现如下画面,就说明httpd正常运行了。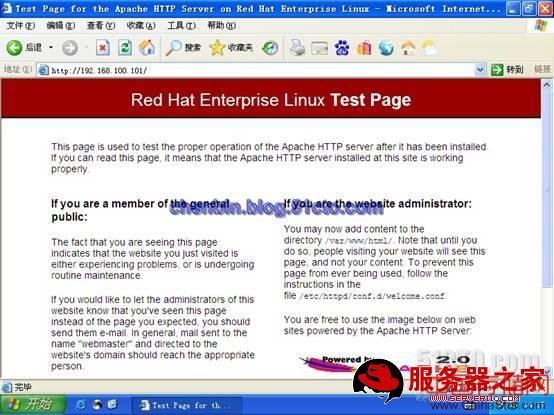
如果想把这个页面换成自己的网页,只需把写好的文件放入/var/www/html下面即可,下面举个简单的例子。如:
[[email protected] ~]# echo chenbin.blog.51cto.com -> /var/www/html/index.html
访问测试一下:
用户的个人网站。
[[email protected] ~]# vi /etc/httpd/conf/httpd.conf
:set number //显示行号
找到<IfModule mod_userdir.c>,在下面有
UserDir disable
#UserDir public_html
改成:
#UserDir disable
UserDir public_html
[[email protected] ~]# service httpd restart
创建目录和网页文件。如果希望每个新建的用户都有一个www目录,只需在/etc/skel/下添加www目录即可,因为每个用户的默认目录都是参考/etc/skel的目录。
[[email protected] ~]# mkdir public_html
[[email protected] ~]# chmod 755 public_html //修改权限。
[[email protected] chenbin]# chmod 755 ~
[[email protected] ~]# echo hello > public_html/index.html
测试:

注意:在地址栏里输入的是http://IP地址或主机名/~root。在root前面有个~,在键盘ESC键下面(数字1左边)那个键,要同时按住shift键。
那么有没有办法不输入那个~呢,当然是有的,最简单的方法就是添加一个链接:
[[email protected] ~]# cd /var/www/html/
[[email protected] html]# ln -s /root/public_html/ root //创建一个链接,因为这里是root帐户,所以是/root/public _html,如果是其他用户,应该是/home/用户名/public_html。

如果不想别人知道你的用户名,也可以把链接后面跟的用户名换成你想要的名字,如:
[[email protected] html]# ln -s /root/public_html/ linux
再访问:

当然还有别的方法,将在下面介绍。
现在如果我们有多个网站,但只有一个IP地址,那怎么让别人能同时访问这多个网站呢?
相同IP不同端口的虚拟主机。
假设我们有一个IP是192.168.100.101,有两个网站,我们可以使用两个端口,比如:一个使用81,一个使用82。
首先,把两个网站的目录和文件建立好。
[[email protected] html]# cd /var/www
[[email protected] www]# mkdir html1
[[email protected] www]# mkdir html2
[[email protected] www]# echo html1 > html1/index.html
[[email protected] www]# echo html2 > html2/index.html
修改配置文件:
[[email protected] html]# vi /etc/httpd/conf/httpd.conf
Listen 80 //在这下面添加两个端口
Listen 81
Listen 82
在最后添加:
<VirtualHost 192.168.100.101:81>
DocumentRoot /var/www/html1
</VirtualHost>
<VirtualHost 192.168.100.101:82>
DocumentRoot /var/www/html2
</VirtualHost>
修改完成,重启服务:
[[email protected] www]# service httpd restart
测试:

这时访问的时候有点不一样了,需要在IP地址后面加上:再加上端口号。

都可以访问,这就完成了。
不同IP相同端口的虚拟主机。
知道相同IP不同端口的配置了,这里相同端口不同IP就简单了,就按照上面的思路做。
因为是多个IP,所以这里就要配置多个IP地址,这里就配置子接口。
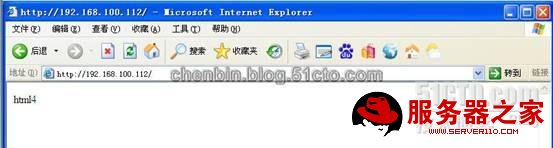
[[email protected] www]# ifconfig eth0:0 192.168.100.111 up
[[email protected] www]# ifconfig eth0:1 192.168.100.112 up
创建目录和网页文件:
[[email protected] www]# mkdir html3
[[email protected] www]# mkdir html4
[[email protected] www]# echo html3 > html3/index.html
[[email protected] www]# echo html4 > html4/index.html
修改配置文件:
[[email protected] www]# vi /etc/httpd/conf/httpd.conf
至于端口,就使用默认的80端口。
<VirtualHost 192.168.100.111:80>
DocumentRoot /var/www/html3
</VirtualHost>
<VirtualHost 192.168.100.112:80>
DocumentRoot /var/www/html4
</VirtualHost>
重启服务:
[[email protected] www]# service httpd restart
测试:

下一个:
这个也就完成了。
使用域名的虚拟主机。
基于域名的虚拟主机,这就要用到DNS了,那么首先把DNS配置一下吧,虽然前面有配置DNS的详细说明,但这里还是简单配置一下,就当复习一下。
安装DNS软件:
[[email protected] www]# cd /misc/cd/Server/
[[email protected] Server]# rpm -ivh bind-9.3.6-4.P1.el5_4.2.i386.rpm
[[email protected] Server]# rpm -ivh bind-chroot-9.3.6-4.P1.el5_4.2.i386.rpm
[[email protected] Server]# rpm -ivh bind-utils-9.3.6-4.P1.el5_4.2.i386.rpm
[[email protected] Server]# rpm -ivh caching-nameserver-9.3.6-4.P1.el5_4.2.i386.rpm
[[email protected] Server]# cd ~
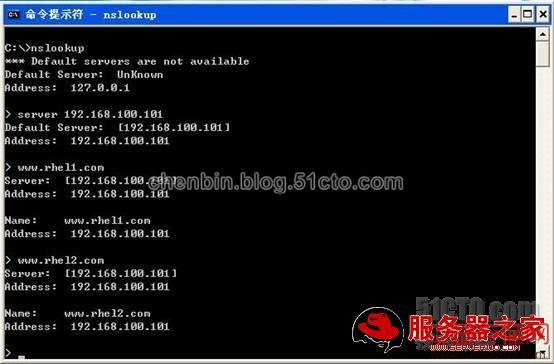
[[email protected] ~]# vi /var/named/chroot/etc/named.caching-nameserver.conf
listen-on port 53 { 192.168.100.101; }; //修改一下IP地址。
allow-query { any; }; //允许所有人查询。
match-clients { any; }; //允许所有客户端。
match-destinations { any; }; //允许所有目标。
创建区域:
[[email protected] ~]# vi /var/named/chroot/etc/named.rfc1912.zones
添加以下区域:
zone "rhel1.com" IN {
type master;
file "rhel1.com.zone";
allow-update { none; };
};
zone "rhel2.com" IN {
type master;
file "rhel2.com.zone";
allow-update { none; };
};
修改区域配置文件;
[[email protected] ~]# cd /var/named/chroot/var/named/
[[email protected] named]# cp -p localhost.zone rhel1.com.zone //别忘了加-p。
[[email protected] named]# cp -p localhost.zone rhel2.com.zone
[[email protected] named]# vi rhel1.com.zone
www IN A 192.168.100.101 //添加这一行
[[email protected] named]# vi rhel2.com.zone
www IN A 192.168.100.101 //也是添加这一行
配置完成,重启一下服务。
[[email protected] named]# service named restart
来测试一下DNS:如图:
DNS配置就可以了,下面接下来配置:
[[email protected] named]# cd /var/www/
[[email protected] www]# mkdir html5
[[email protected] www]# mkdir html6
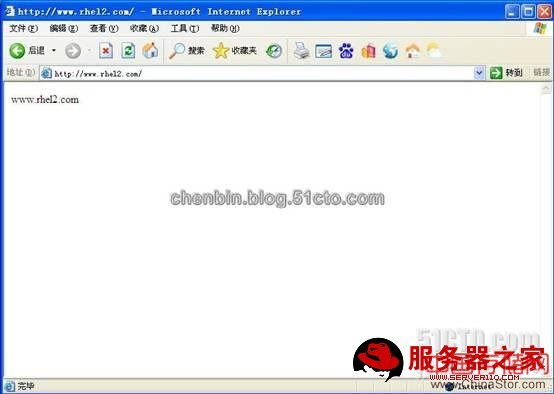
[[email protected] www]# echo www.rhel1.com > html5/index.html
[[email protected] www]# echo www.rhel2.com > html6/index.html
[[email protected] www]# vi /etc/httpd/conf/httpd.conf
NameVirtualHost 192.168.100.101
<VirtualHost 192.168.100.101>
ServerName www.rhel1.com
DocumentRoot /var/www/html5
</VirtualHost>
<VirtualHost 192.168.100.101>
ServerName www.rhel2.com
DocumentRoot /var/www/html6
</VirtualHost>
配置完成,重启服务。
[[email protected] www]# service httpd restart
现在可以测试了,但现在访问还不行,我们还得把用作测试的主机的DNS指向192.168.100.101,关于指定DNS就不演示了,这个太简单了,接下来就可以测试了。如图:

第二个:
好了,基于域名的虚拟主机就到这里。
虚拟目录。
虚拟目录也可以说是别名,也就是可以使用多个名称来访问一个目录。比如,在上面说的那个访问时要加个~的,我们使用了一个链接可以解决,这里就使用另一种方法来解决,虚拟目录。
[[email protected] www]# vi /etc/httpd/conf/httpd.conf
添加如下几行:
Alias /rhel "/root/public_html/" //注意:在/rhel后面不要加上/。
<Directory "/root/public_html/">
Options Indexes MultiViews
AllowOverride None
Order allow,deny
Allow from all
</Directory>
[[email protected] www]# service httpd restart
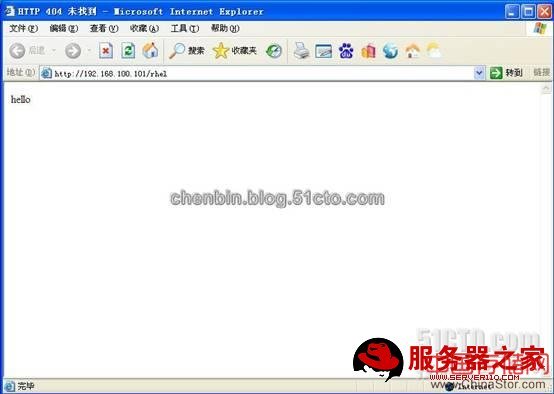
完成。
声明: 此文观点不代表本站立场;转载须要保留原文链接;版权疑问请联系我们。