本文介绍使用Nginx+keepalived搭建主备高可用负载均衡服务器集群,希望对于初学Nginx服务器相关的朋友有帮助,更多Nginx安装、配置、报错处理等资源请本站内搜索。。
公司一个业务网站系统之前上线时有提过做负载均衡方案,但后来因为种种原因未能正常上线,整个系统全部是单点故障,运行了大半年时间没有出过故障已经是烧高香了。现在系统访问量上来了,需要对系统进行升级解决单点故障的问题。老板说要我负责把这个系统升级方案规划好。
我根据目前一些资料情况,给出了一份用nginx+keepalived做主备负载均衡的方案,另外老板也比较倾向于nginx软件,所以方案给出了之后,就开始实施了。下面是一些配置过程,通过这次的系统升级,也熟悉了一些对nginx这个高效软件的应用。
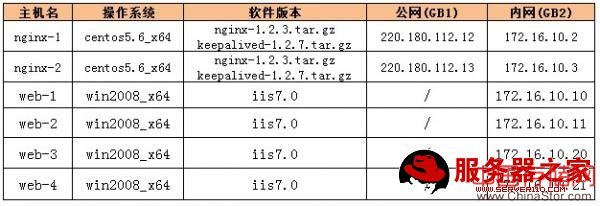
1.系统环境
前端两台centos5.6 64位系统装nginx 和 keepalived 做负载均衡,后端全部是windows2008系统的IIS提供web服务。(只列出部分机器)
2. 安装配置过程
软件下载
[[email protected] ~]# wget http://nginx.org/download/nginx-1.2.3.tar.gz[[email protected] ~]# wget http://nchc.dl.sourceforge.net/project/pcre/pcre/8.12/pcre-8.12.tar.gz
[[email protected] ~]# wget http://www.keepalived.org/software/keepalived-1.2.7.tar.gz
1) Nginx安装配置(两台机器一样安装)
[[email protected] ~]# tar zxvf pcre-8.12.tar.gz[[email protected] ~]# cd pcre-8.12
[[email protected] ~]# ./configure
[[email protected] ~]# make && make install
[[email protected] ~]# groupadd www
[[email protected] ~]# useradd –g www www
[[email protected] ~]# tar zxvf nginx-1.2.3.tar.gz
[[email protected] ~]# cd nginx-1.2.3
[[email protected] ~]# ./configure --user=www --group=www
--prefix=/usr/local/nginx
--with-http_stub_status_module
--with-http_ssl_module
[[email protected] ~]# make && make install
2) Keepalived安装配置(两台机器都要安装)
[[email protected] ~]# tar zxvf keepalived-1.2.7.tar.gz[[email protected] ~]# cd keepalived-1.2.7
[[email protected] ~]# ./configure –prefix=/usr/local/keepalived
[[email protected] ~]# make && make install
[[email protected] ~]# mkdir /etc/keepalived
[[email protected] ~]# cp /usr/local/keepalived/etc/keepalived/keepalived.conf /etc/keepalived/
[[email protected] ~]# cp /usr/local/keepalived/etc/sysconfig/keepalived /etc/sysconfig/
[[email protected] ~]# cp /usr/local/keepalived/etc/rc.d/init.d/keepalived /etc/init.d/
[[email protected] ~]# chkconfig --add keepalived
[[email protected] ~]# chkconfig keepalived on
3) Keepalived 配置
(主keepalived即nginx-1上的配置)! Configuration File for keepalived
global_defs {
notification_email {
[email protected]
}
notification_email_from [email protected]
smtp_server 127.0.0.1
smtp_connect_timeout 30
router_id LVS_DEVEL
}
vrrp_script Monitor_Nginx {
script "/usr/local/scripts/nginx_pid.sh"
interval 2
weight 2
}
//定义一个检测nginx程序的脚本
vrrp_instance VI_1 {
state MASTER
interface eth1 // 实例绑定到一块稳定的网卡上
virtual_router_id 51
priority 180 // 评定优先级,数值大的为master
advert_int 1 // 心跳检测时间,单位秒
authentication { // 主备nginx之间的通信认证
auth_type PASS
auth_pass 1234
}
track_script {
Monitor_Nginx
}
virtual_ipaddress { // 配置VIP、子网掩码、VIP要游动的网卡
220.180.112.14/27 dev eth0
220.180.112.15/27 dev eth0
172.16.10.99/24 dev eth1
}
}
(备keepalived 上的配置)
! Configuration File for keepalived
global_defs {
notification_email {
[email protected]
}
notification_email_from [email protected]
smtp_server 127.0.0.1
smtp_connect_timeout 30
router_id LVS_DEVEL
}
vrrp_script Monitor_Nginx {
script "/usr/local/scripts/nginx_pid.sh"
interval 2
weight 2
}
vrrp_instance VI_1 {
state BACKUP
interface eth1
virtual_router_id 51
priority 100
advert_int 1
authentication {
auth_type PASS
auth_pass 1234
}
track_script {
Monitor_Nginx
}
virtual_ipaddress {
220.180.112.14/27 dev eth0
220.180.112.15/27 dev eth0
172.16.10.99/24 dev eth1
}
}
(/usr/local/scripts/nginx_pid.sh脚本的内容)
[[email protected] ~]# cat /usr/local/scripts/nginx_pid.sh
#!/bin/bash
A=`ps -C nginx --no-header |wc -l`
if [ $A -eq 0 ];then // 判断nginx是否未启用
/usr/local/nginx/sbin/nginx // 运行nginx
sleep 3
if [ `ps -C nginx --no-header |wc -l` -eq 0 ];then
//3秒后检测,如果nginx启动出错就关闭keepalived
killall keepalived
fi
fi
4) Nginx配置
两台nginx的配置一样,如下:
user www www;
worker_processes 1;
#error_log logs/error.log;
#error_log logs/error.log notice;
#error_log logs/error.log info;
#pid logs/nginx.pid;
events {
use epoll;
worker_connections 51200;
}
http {
include mime.types;
default_type application/octet-stream;
log_format main '$remote_addr - $remote_user [$time_local] "$request" '
'$status $body_bytes_sent "$http_referer" '
'"$http_user_agent" "$http_x_forwarded_for"';
access_log logs/access.log main;
sendfile on;
#tcp_nopush on;
#keepalive_timeout 0;
keepalive_timeout 65;
gzip on;
#####################################
web
upstream web {
server 172.16.10.10;
server 172.16.10.11;
ip_hash;
}
pic
upstream pic {
server 172.16.10.20;
server 172.16.10.21;
ip_hash;
}
natip
upstream natip {
server 172.16.10.20:8080;
server 172.16.10.21:8080;
ip_hash;
}
#########################################
web
server {
listen 80;
server_name www.abc.com;
location / {
proxy_pass http://web;
proxy_set_header Host $host;
proxy_set_header X-Real-IP $remote_addr;
proxy_set_header X-Forwarded-For $proxy_add_x_forwarded_for;
}
location /status {
stub_status on;
access_log off;
error_log off;
}
}
pic
server {
listen 80;
server_name pic.abc.com;
location / {
proxy_pass http://pic;
proxy_set_header Host $host;
proxy_set_header X-Real-IP $remote_addr;
proxy_set_header X-Forwarded-For $proxy_add_x_forwarded_for;
}
location /status {
stub_status on;
access_log off;
error_log off;
}
}
natip
server {
listen 8080;
server_name 172.16.10.4;
location / {
proxy_pass http://natip;
proxy_set_header Host $host;
proxy_set_header X-Real-IP $remote_addr;
proxy_set_header X-Forwarded-For $proxy_add_x_forwarded_for;
}
location /status {
stub_status on;
access_log off;
error_log off;
}
}
}
3. Keepalived 主备切换测试
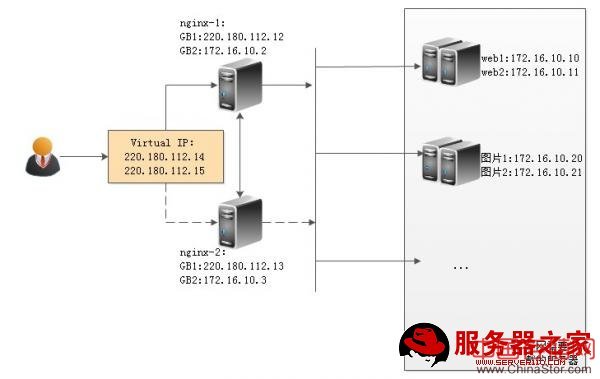
首先启动两台服务器的keepalived和nginx,Keepalived虚拟出两个公网IP地址,220.180.112.14和15,长ping此IP地址,关闭nginx-1机器上的keepalived服务,ping在中断2-3秒后又恢复正常,访问web站点正常,查看备用keepalived日志,发现参数由BACKUP变为MASTER,关闭nginx-1机器的网卡也能实现一样的效果。重新启用nginx-1的keepalived和nginx服务,再分别尝试关闭nginx-2机器上的keepalived服务或者网卡,发现ping以及页面访问都正常。
4. Nginx 负载均衡测试
Nginx负载均衡常用的有两种负载方式,rr和ip_hash,rr负载是根据用户访问请求进行后台real-server的轮询,ip_hash负载是将用户访问web时的IP地址,进行一个hash算法,根据得出的值的情况将用户访问分配到对应的real-server上,用户如果IP地址不变将会一直访问同一台real-server。两种负载均衡在其中一台real-server宕机的情况下,都会选择下一台将访问转移到下一台real-server上。我们这里采用ip_hash负载方式。
Nginx通过下面的代码将对220.180.112.14的访问负载到172.16.10.10和11两台内网web服务器上,访问通过IP地址能够正常访问页面,停止172.16.10.10和11其中一块网卡,访问不中断。
upstream 220.180.112.14 {server 172.16.10.10;
server 172.16.10.11;
ip_hash;
}
5. 上面就是整个nginx+keepalived实现主备负载均衡过程中的一些配置,完成根据自己实施情况来写,有什么不对的地方,或者好的建议,希望大家留言告之,大家共同交流学习。
声明: 此文观点不代表本站立场;转载须要保留原文链接;版权疑问请联系我们。