本文介绍Nginx服务器配置httpbasicauth保护目录的方法,希望对于初学Nginx服务器相关的朋友有帮助,更多Nginx安装、配置、报错处理等资源请本站内搜索。。
Nginx下的配置也挺方便的,我们可以沿用由Apache的htpasswd模块生成的.htpasswd文件作为密码文件。注意,nginx 的 http auth basic 的密码是用 crypt(3) 加密的,而apache是md5加密。所以生成时:
1 /usr/local/apache2/bin/htpasswd -c -d pass_file user_name
2 #回车输入密码,-c 表示生成文件,-d 是以 crypt 加密。
对于lnmp用户,一般不安装apache了,文末会告诉你个生成方法。
我们将这个htpasswd文件放到nginx/conf下,记得chmod 400 htpasswd来保护一下。
然后修改nginx.conf:
02 server_name www.server110.com;
03 root /var/www/www.server110.com;
04 include /etc/nginx/fastcgi_php;
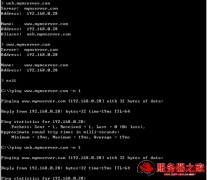
06 auth_basic "Password please";
07 auth_basic_user_file /usr/local/nginx/conf/htpasswd;
08 index index.php;
09 if (!-e $request_filename) {
10 rewrite ^(.*)$ /index.php last;
加入了
1 auth_basic "Password please";
2 auth_basic_user_file /usr/local/nginx/conf/htpasswd;
重启nginx即可。
========
最后我们说下怎么在nginx下生成htpasswd
下载这个python文件:http://trac.edgewall.org/export/10770/trunk/contrib/htpasswd.py (nginx wiki里推荐的)
运行示例
./htpasswd.py -c -b htpasswd username password
#-c为生成文件 htpasswd为文件名
声明: 此文观点不代表本站立场;转载须要保留原文链接;版权疑问请联系我们。